How to Do Serial Dilution (Step-by-Step with Tables & Calculator)
Serial dilution is a core laboratory technique used to reduce the concentration of a solution in a stepwise manner.
It is widely applied in molecular biology, microbiology, pharmacology, biochemistry, and many other research areas.
Whether you are preparing a standard curve for a spectrophotometric assay, reducing bacterial concentration for plating, or adjusting chemical concentrations for a reaction, mastering this method will improve your accuracy.
In this guide, you’ll learn:
- What a serial dilution is
- Step-by-step instructions for preparing eight dilution levels (including stock and blank)
- Tables for both 2-fold and 10-fold dilution series
- How to set this up for tubes or a 96-well plate
- The role of dilution factors
- How to speed up the process using our Serial Dilution Calculator.
What Is Serial Dilution?
Serial dilution is a method of diluting a solution multiple times by the same factor, for example it can be like 1:2 (two-fold) or 1:10 (ten-fold), in a sequence.
Each dilution step uses a measured volume of the solution from the previous step (tube or well), mixing it with a measured volume of diluent (such as water, PBS, or buffer).
This approach helps achieve large overall dilutions without needing to pipette extremely small volumes.
For example:
But a series of three 1:10 dilutions gives the same result (1:10 × 1:10 × 1:10 = 1:1000), and is much more accurate.
A single step dilution of 1:1000 is hard to measure accurately
When to Use Serial Dilutions
Serial dilutions are used in many lab workflows, such as:
- Preparing standard curves for absorbance or fluorescence measurements
- Determining bacterial or viral titers in microbiology
- Adjusting reagent concentrations in enzyme kinetics experiments
- Creating a range of drug concentrations in dose–response assays
Because of its flexibility, the method can be scaled for test tubes, microcentrifuge tubes, or multi-well plates.
Planning a Serial Dilution
Before starting, decide:
- Your dilution factor (e.g., 1:2 or 1:10 or any other customized)
- The total number of dilutions (including stock and blank)
- Final volume in each tube/well (for this guide, we use 1 mL)
- Type of diluent (must be compatible with your experiment, it can be something like buffer or water)
💡 Tip: For highest accuracy, always use calibrated pipettes or graduated cylinders.
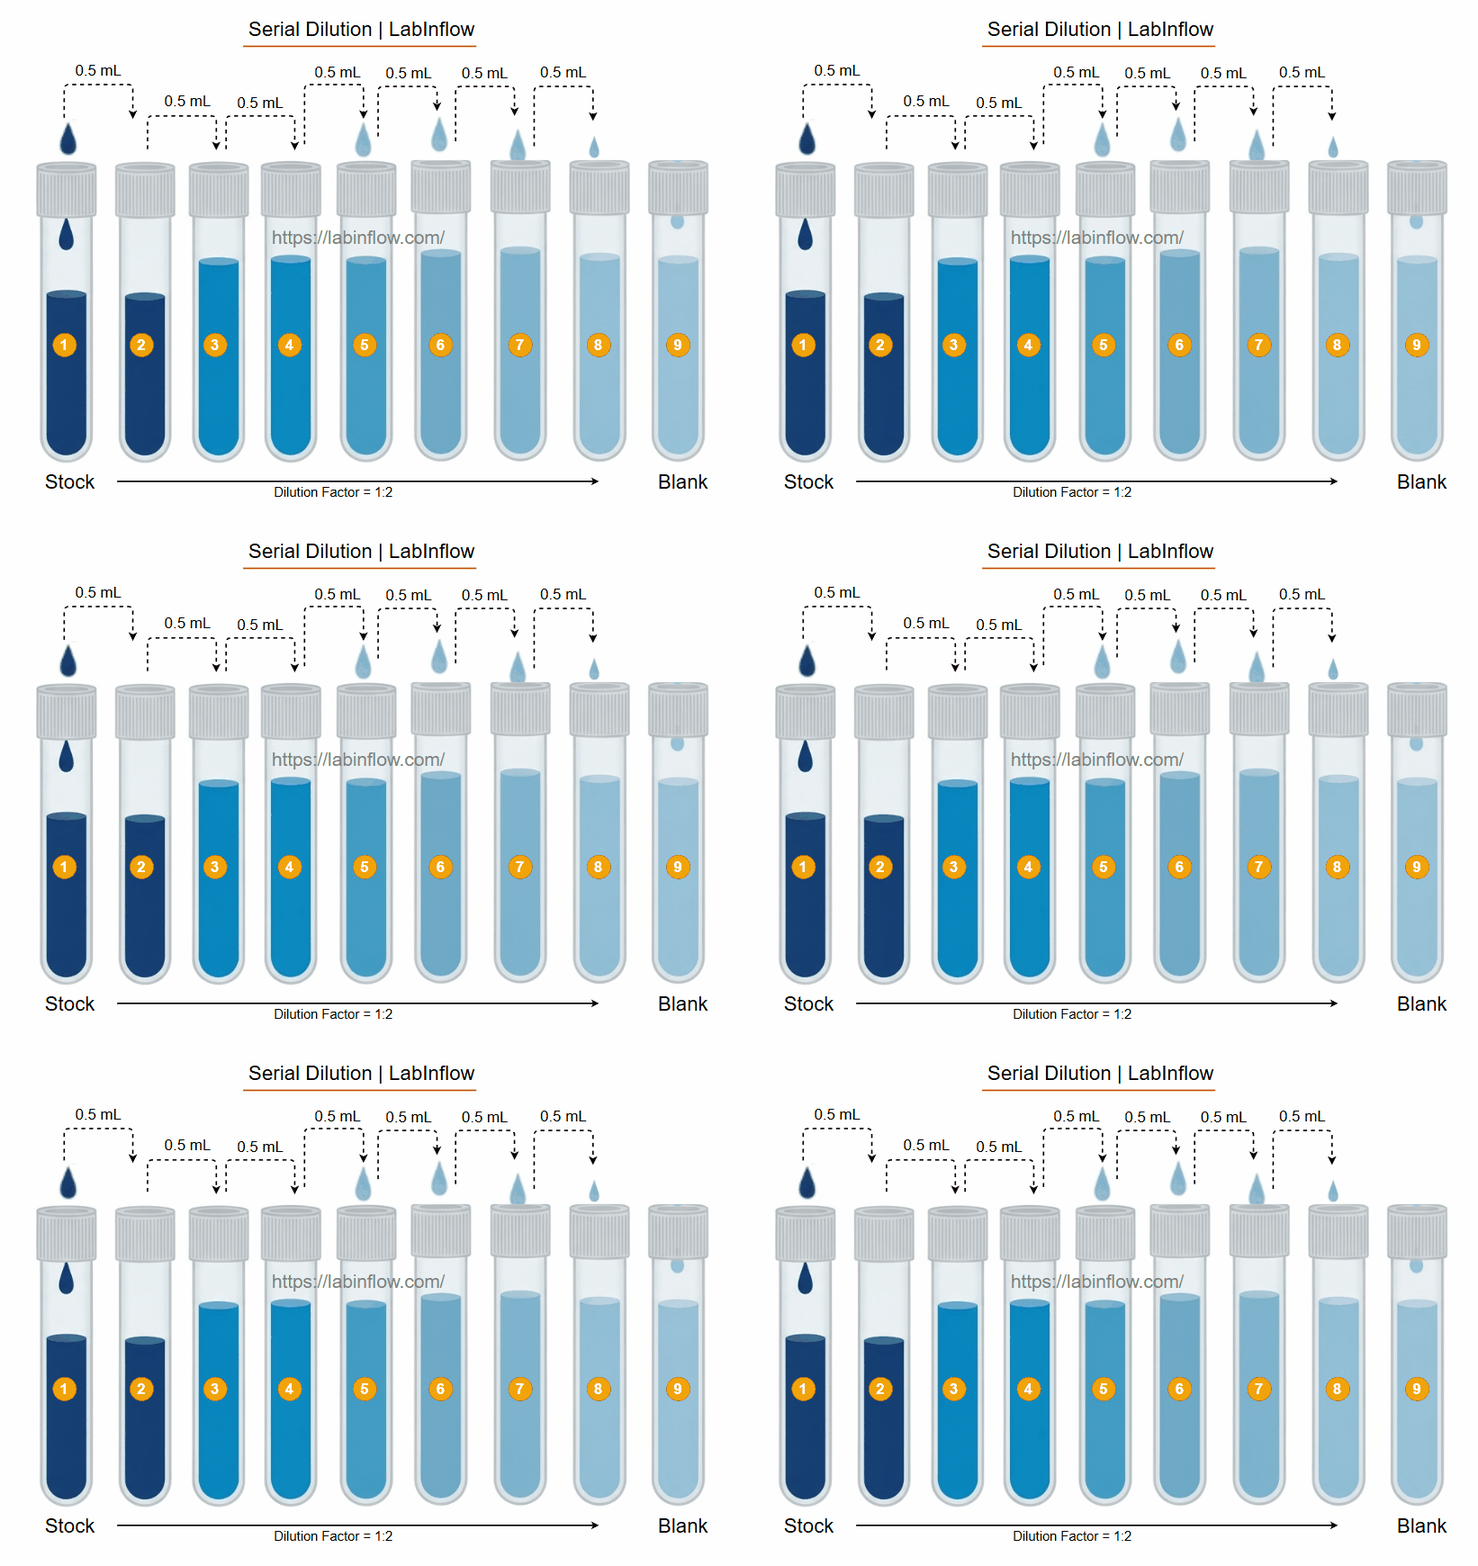
Step-by-Step Example 1:2 Serial Dilution 8 Tubes (Including Stock and Blank)
Preparation (Final volume 1mL):
1. Label your tubes:
- Tube 1 (or Row) = Stock (undiluted sample)
- Tube 2–7 (or Row)= Dilutions D1–D6 (6 serial dilutions)
- Tube 8 (or Row)= Blank (diluent only, no sample) – used for background subtraction.
2. Prepare your diluent (e.g., PBS, water):
- Tubes 2–7: Add 0.5 mL (500 μL) of diluent to each tube.
- Tube 8 (Blank): Add 1 mL (1000 μL) of diluent.
- Tube 1 (Stock): Initially empty or keep original stock aside.
3. Set up your pipette:
- Use a calibrated pipette for accurate volume transfer.
- Important: Always change tips between different samples to avoid contamination.
💡Dilution steps are below table
Stepwise Dilution:
- Step 1 – First dilution (Tube 1 → Tube 2):
- Transfer 0.5 mL (500 μL) from the stock (Tube 1) to Tube 2 (already contains 0.5 mL diluent).
- Mix thoroughly.
- Final volume in Tube 2: 0.5 mL (diluent) + 0.5 mL (sample) = 1 mL.
- Step 2 – Second dilution (Tube 2 → Tube 3):
- Transfer 0.5 mL from Tube 2 to Tube 3 (already contains 0.5 mL diluent).
- Mix thoroughly.
- Final volume in Tube 3: 1 mL (0.5 mL sample + 0.5 mL diluent).
- Tube 2 now contains 1 mL (after transfer), ready for next dilution.
- Step 3 – Third dilution (Tube 3 → Tube 4):
- Transfer 0.5 mL from Tube 3 to Tube 4 (already contains 0.5 mL diluent).
- Mix thoroughly.
- Final volume in Tube 4: 1 mL.
- Step 4 – Fourth dilution (Tube 4 → Tube 5):
- Transfer 0.5 mL from Tube 4 to Tube 5 (already contains 0.5 mL diluent).
- Mix thoroughly.
- Final volume in Tube 5: 1 mL.
- Step 5 – Fifth dilution (Tube 5 → Tube 6):
- Transfer 0.5 mL from Tube 5 to Tube 6 (already contains 0.5 mL diluent).
- Mix thoroughly.
- Final volume in Tube 6: 1 mL.
- Step 6 – Sixth dilution (Tube 6 → Tube 7):
- Transfer 0.5 mL from Tube 6 to Tube 7 (already contains 0.5 mL diluent).
- Mix thoroughly.
- Final volume in Tube 7: 1 mL.
- Step 7 – Blank tube (Tube 8):
- Tube 8 only contains 1 mL of diluent.
- No sample is added.
- Used for background measurement in experiments.

Key Notes / Tips for Accuracy:
- Always mix thoroughly after each transfer to ensure uniform concentration.
- Use fresh tips to avoid cross-contamination.
- The final volume in every tube is 1 mL because each tube already contains 0.5 mL of diluent and receives 0.5 mL of sample.
- Stock tube always retains 1 mL (or more, if starting with extra) for sequential dilutions.
- Dilution factor doubles each step: 1:2 → 1:4 → 1:8 → 1:16 → 1:32 → 1:64.
- Relative concentrations decrease as 100% → 50% → 25% → 12.5% → 6.25% → 3.125% → 1.5625%.
1:10 Serial Dilution Table (1 mL final volume per tube)
Use a Serial Dilution Calculator
To avoid manual errors and save time, you can use our free online dilution calculator:
👉 Try the Serial Dilution Calculator Here – Its free, you can download it as excel file or pdf.
Just enter the dilution factor (e.g., 1:2 or 1:10), number of steps, and desired final volume — it will auto-generate the values and instructions for you.
Researchers also were interested to know
👉 Key Difference: Serial Dilution vs Standard Preparation – See full comparison.


